Admin Mobile
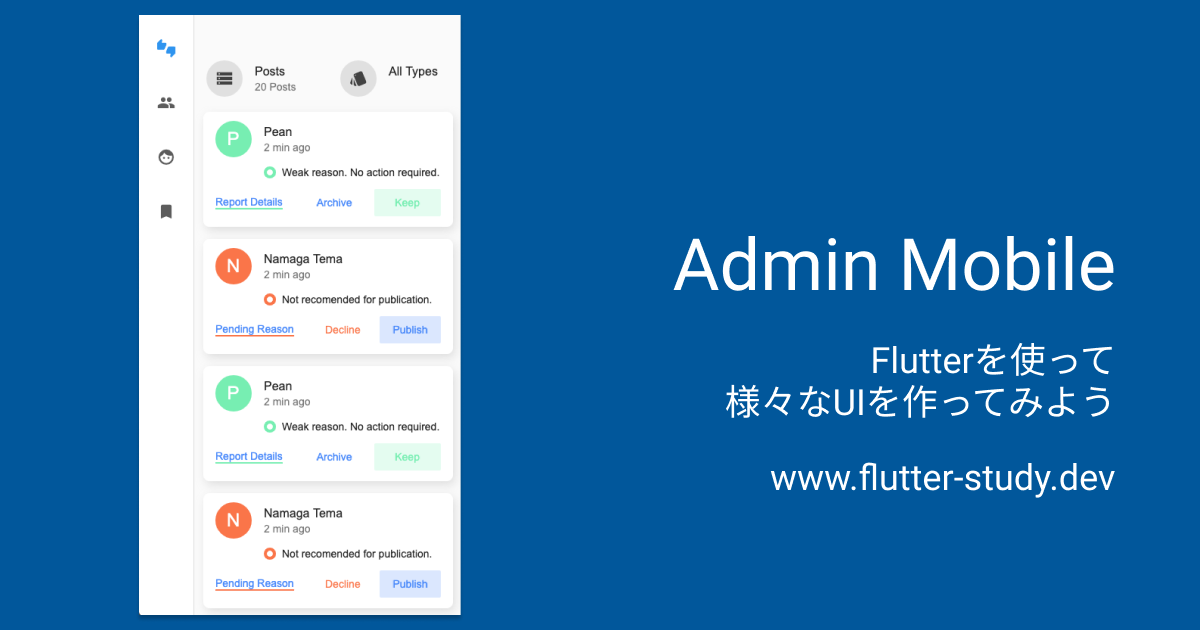
今回作成するUI
今回作成するUIは👇をベースに考えています。
完成イメージ
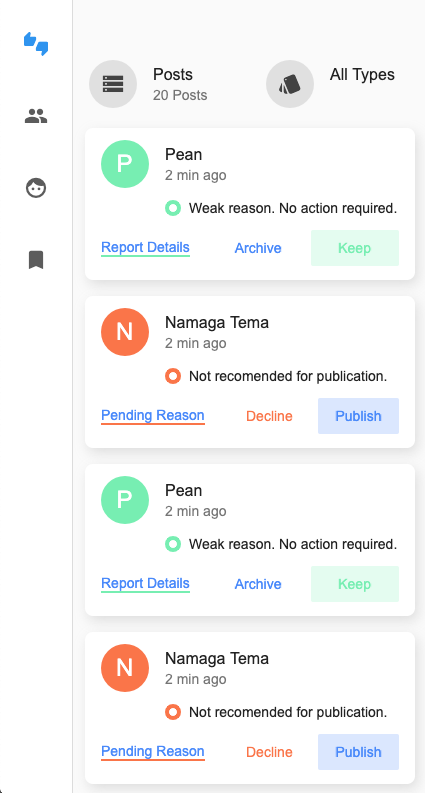
以下のような画面を作ってみましょう。
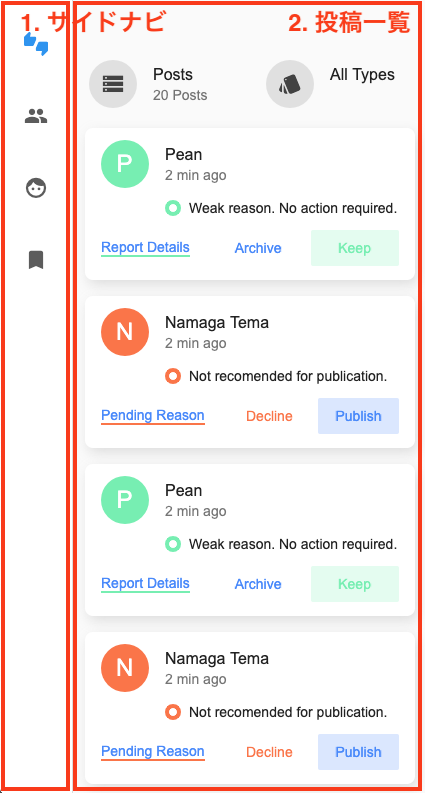
今回は大きく分けて2つの要素に分かれています。
- サイドナビ
- 投稿一覧
それでは、各要素ごとにUIを作ってみましょう。
|
|
共通部分
まずはじめに、各Widgetを表示する土台となる部分を作りましょう。
import 'package:flutter/material.dart';
void main() {
runApp(MyApp());
}
class MyApp extends StatelessWidget {
// This widget is the root of your application.
Widget build(BuildContext context) {
return MaterialApp(
debugShowCheckedModeBanner: false,
title: 'Flutter Demo',
theme: ThemeData.light(),
home: AdminMobilePage(),
);
}
}
class AdminMobilePage extends StatelessWidget {
Widget build(BuildContext context) {
return Scaffold(
body: Row(
children: [
/* ここにWidgetを並べていく */
],
),
);
}
}
サイドナビ
次にサイドナビの部分を作っていきましょう。
一見、このサイドナビを作るのはちょっと手間がかかりそうに見えますが、
実は簡単に作れるWidgetがすでに用意されているのです。
NavigationRail を使うと簡単に実装できちゃいます。
使い方も簡単で、表示したいアイコンを並べるだけでOKです。
class SideNavigation extends StatefulWidget {
_SideNavigationState createState() => _SideNavigationState();
}
class _SideNavigationState extends State<SideNavigation> {
int selectedIndex = 0;
Widget build(BuildContext context) {
return NavigationRail(
selectedIndex: selectedIndex,
onDestinationSelected: (index) {
setState(() {
selectedIndex = index;
});
},
destinations: [
NavigationRailDestination(
icon: Icon(Icons.thumbs_up_down),
label: Text('ThumbsUpDown'),
),
NavigationRailDestination(
icon: Icon(Icons.people),
label: Text('People'),
),
NavigationRailDestination(
icon: Icon(Icons.face),
label: Text('Face'),
),
NavigationRailDestination(
icon: Icon(Icons.bookmark),
label: Text('Bookmark'),
),
],
);
}
}
投稿一覧
次に投稿一覧の部分を作っていきましょう。
各投稿は、よく見るカード型のUIをしていますね。
こういったマテリアルデザインが元になっているWidgetはたくさん用意されているので、
用途にあったWidgetを組み合わせて簡単に実装できるのです。
ここでは、カード型の Card と、
アイコン・タイトル・サブタイトルといった要素が並んだ ListTile を組み合わせます。
そして、投稿一覧は画面からはみ出た場合にスクロール出来るよう、
ListView を使いましょう。
https://www.youtube.com/watch?v=l8dj0yPBvgQ
https://www.youtube.com/watch?v=KJpkjHGiI5A
class _PostsHeader extends StatelessWidget {
Widget build(BuildContext context) {
return Row(
children: [
Expanded(
flex: 1,
child: ListTile(
leading: ClipOval(
child: Container(
color: Colors.grey[300],
width: 48,
height: 48,
child: Icon(
Icons.storage,
color: Colors.grey[800],
),
),
),
title: Text('Posts'),
subtitle: Text('20 Posts'),
),
),
Expanded(
flex: 1,
child: ListTile(
leading: ClipOval(
child: Container(
color: Colors.grey[300],
width: 48,
height: 48,
child: Icon(
Icons.style,
color: Colors.grey[800],
),
),
),
title: Text('All Types'),
subtitle: Text(''),
),
),
],
);
}
}
class _Post extends StatelessWidget {
final String name;
final String message;
final String textReason;
final Color colorPrimary;
final Color colorPositive;
final String textPositive;
final Color colorNegative;
final String textNegative;
const _Post({
Key key,
this.name,
this.message,
this.textReason,
this.colorPrimary,
this.colorPositive,
this.textPositive,
this.colorNegative,
this.textNegative,
}) : super(key: key);
Widget build(BuildContext context) {
return Container(
margin: EdgeInsets.symmetric(horizontal: 8, vertical: 4),
child: Card(
elevation: 8,
shadowColor: Colors.grey,
shape: RoundedRectangleBorder(
borderRadius: BorderRadius.circular(8),
),
child: Column(
children: [
ListTile(
leading: ClipOval(
child: Container(
color: colorPrimary,
width: 48,
height: 48,
child: Center(
child: Text(
name.substring(0, 1),
style: TextStyle(color: Colors.white, fontSize: 24),
),
),
),
),
title: Text(name),
subtitle: Text('2 min ago'),
),
Container(
padding: EdgeInsets.symmetric(horizontal: 8),
child: Row(
crossAxisAlignment: CrossAxisAlignment.start,
children: [
SizedBox(width: 72),
Container(
width: 16,
height: 16,
decoration: BoxDecoration(
border: Border.all(color: colorPrimary, width: 4),
borderRadius: BorderRadius.circular(8),
),
),
SizedBox(width: 8),
Flexible(child: Text(message)),
],
),
),
Container(
padding: EdgeInsets.symmetric(horizontal: 16, vertical: 8),
child: Row(
children: [
Container(
decoration: BoxDecoration(
border: Border(
bottom: BorderSide(color: colorPrimary, width: 2),
),
),
child: Text(
textReason,
style: TextStyle(color: Colors.blueAccent),
),
),
SizedBox(width: 24),
Expanded(
child: TextButton(
style: TextButton.styleFrom(
primary: colorNegative,
),
onPressed: () {},
child: Text(textNegative),
),
),
SizedBox(width: 8),
Expanded(
child: TextButton(
style: TextButton.styleFrom(
primary: colorPositive,
backgroundColor: colorPositive.withOpacity(0.2),
),
onPressed: () {},
child: Text(textPositive),
),
),
],
),
),
],
),
),
);
}
}
class _PostGreen extends StatelessWidget {
Widget build(BuildContext context) {
return _Post(
name: 'Pean',
message: 'Weak reason. No action required.',
textReason: 'Report Details',
colorPrimary: Colors.greenAccent,
colorPositive: Colors.greenAccent,
textPositive: 'Keep',
colorNegative: Colors.blueAccent,
textNegative: 'Archive',
);
}
}
class _PostRed extends StatelessWidget {
Widget build(BuildContext context) {
return _Post(
name: 'Namaga Tema',
message: 'Not recomended for publication.',
textReason: 'Pending Reason',
colorPrimary: Colors.deepOrangeAccent,
colorPositive: Colors.blueAccent,
textPositive: 'Publish',
colorNegative: Colors.deepOrangeAccent,
textNegative: 'Decline',
);
}
}
class PostList extends StatelessWidget {
Widget build(BuildContext context) {
return Container(
padding: EdgeInsets.only(top: 48),
child: Column(
mainAxisSize: MainAxisSize.max,
children: [
_PostsHeader(),
Expanded(
child: ListView(
children: [
_PostGreen(),
_PostRed(),
_PostGreen(),
_PostRed(),
_PostGreen(),
_PostRed(),
],
),
),
],
),
);
}
}
作成したWidgetを表示
最後に、作成したWidgetを表示しましょう。
最初に作成した、土台部分に組み込めばOKです。
class AdminMobilePage extends StatelessWidget {
Widget build(BuildContext context) {
return Scaffold(
body: Row(
children: [
SideNavigation(),
VerticalDivider(thickness: 1, width: 1),
Expanded(
child: PostList(),
),
],
),
);
}
}
お疲れさまでした
UIは無事作成できたでしょうか?
この他にも様々なUIを作ってみて、Flutterで複雑なUIが表現できるように頑張りましょう 💪
