Flight Booking
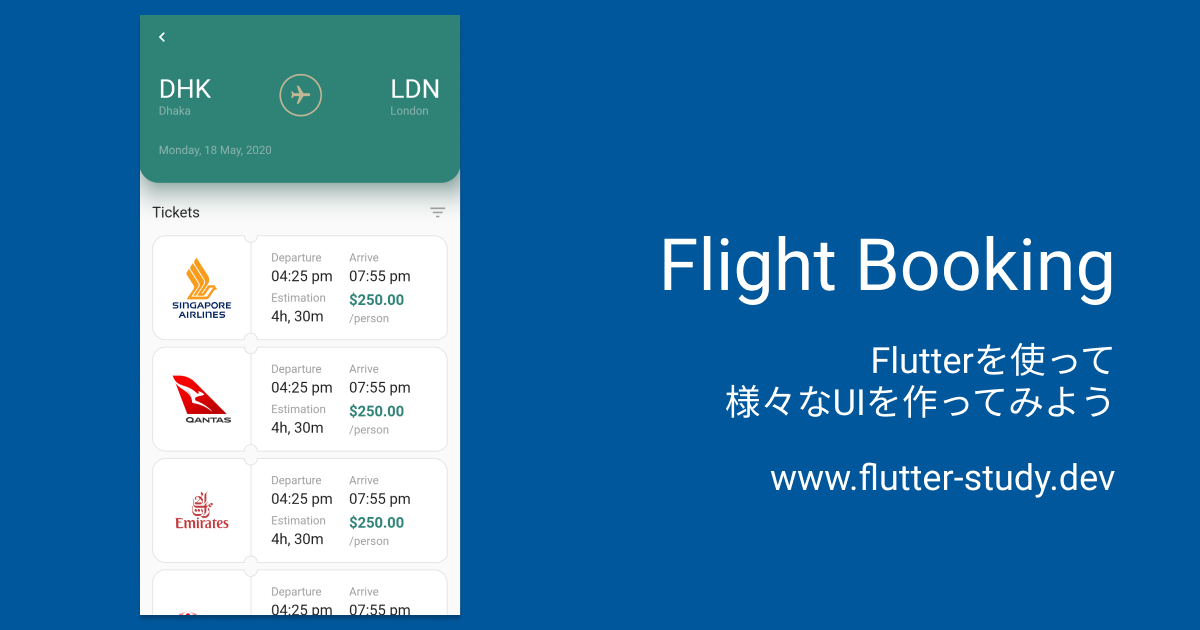
今回作成するUI
今回作成するUIは👇をベースに考えています。
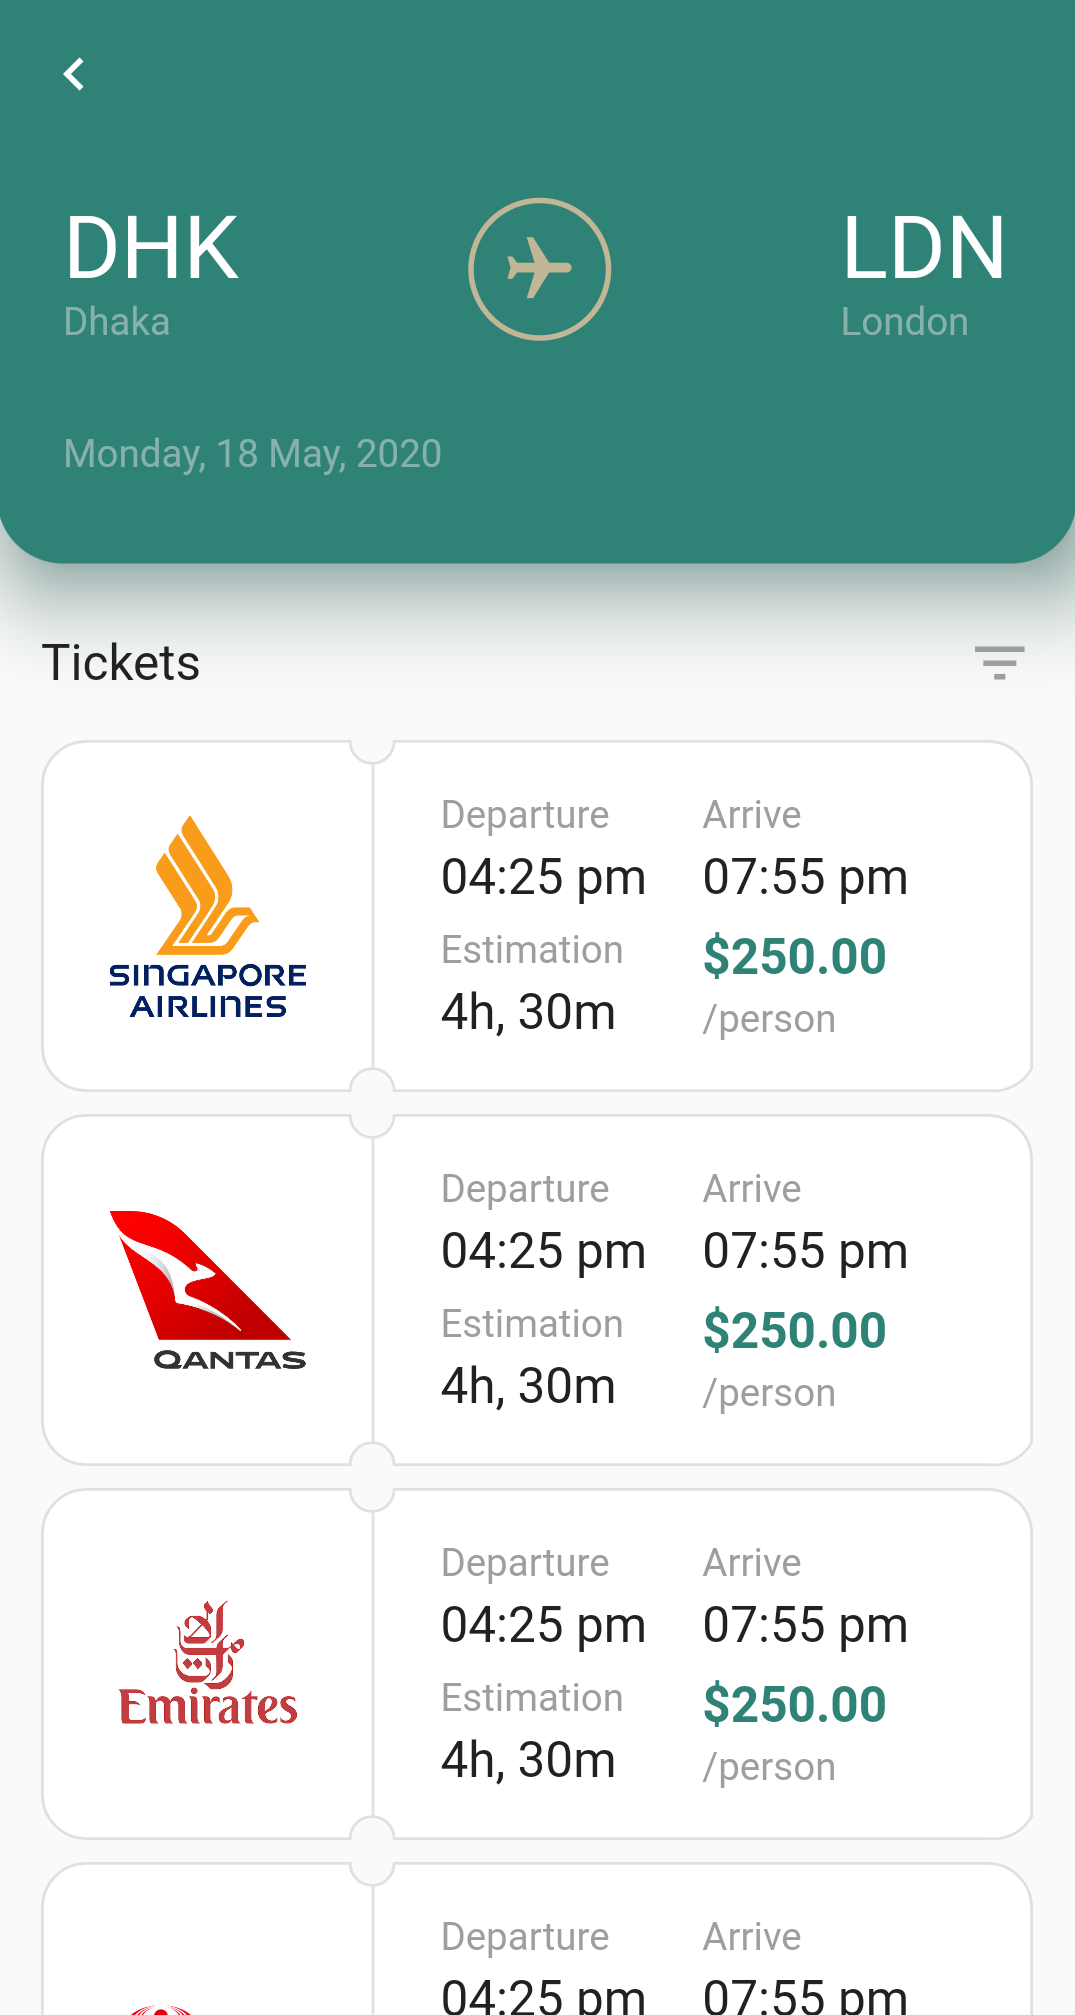
完成イメージ
以下のような画面を作ってみましょう。
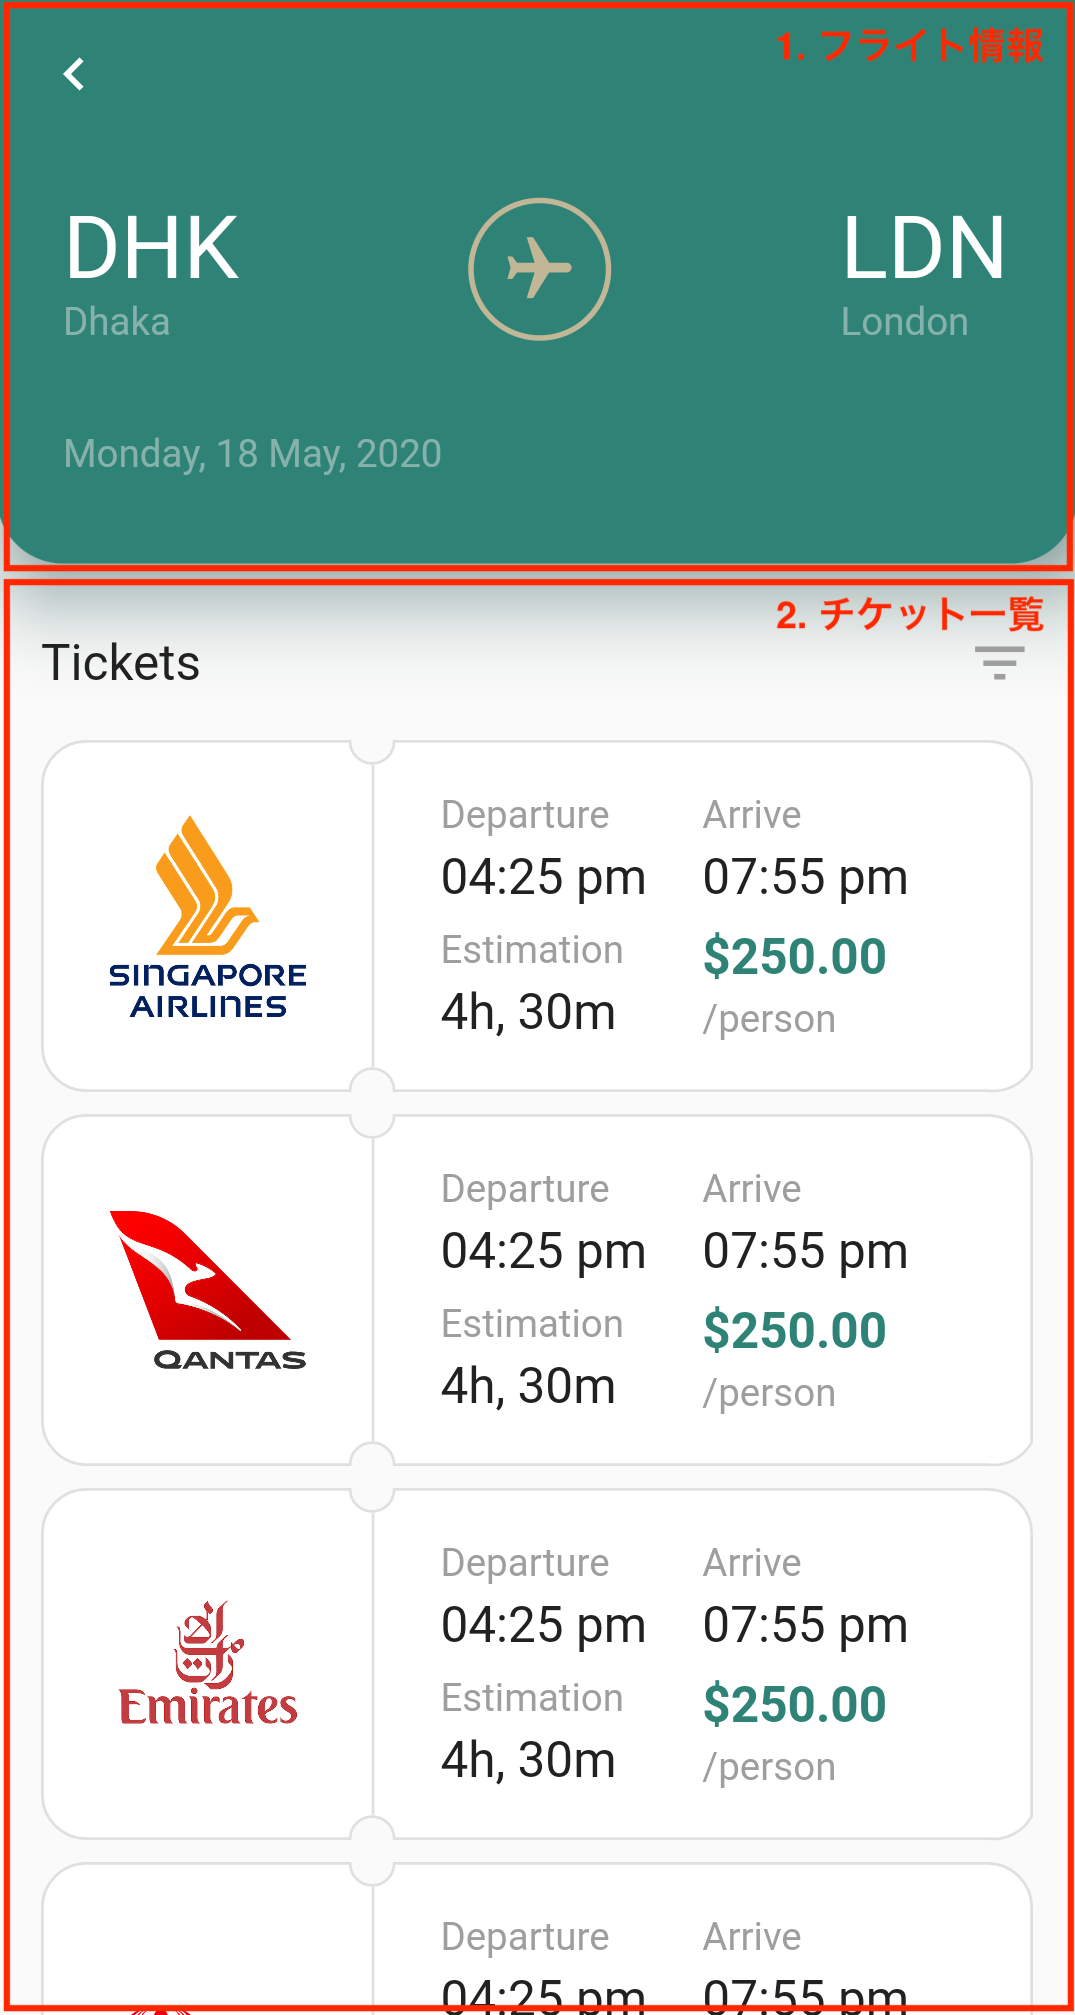
今回は大きく分けて2つの要素に分かれています。
- フライト情報
- チケット一覧
それでは、各要素ごとにUIを作ってみましょう。
|
|
共通部分・AppBar
まずはじめに、各Widgetを表示する土台となる部分を作り、
AppBar を配置しましょう。
import 'dart:math';
import 'dart:ui';
import 'package:flutter/material.dart';
const kColorPrimary = Color(0xFF2E8376);
const kColorText = Color(0xFF9E9E9E);
const kColorTextDark = Color(0xFF212121);
const kColorFlightText = Color(0xFFE0E0E0);
const kColorFlightIcon = Color(0xFFC1B695);
const kColorTicketBorder = Color(0xFFE0E0E0);
const kSingaporeLogoUrl = 'https://user-images.githubusercontent.com/7200238/82220821-1ebc8880-995a-11ea-9d77-07edda64f05c.png';
const kQantasLogoUrl = 'https://user-images.githubusercontent.com/7200238/82220824-1fedb580-995a-11ea-8124-f59daff4ebda.png';
const kEmiratesLogoUrl = 'https://user-images.githubusercontent.com/7200238/82220816-1c5a2e80-995a-11ea-921d-38b3f991d8d2.png';
const kHainanLogoUrl = 'https://user-images.githubusercontent.com/7200238/82223309-73adce00-995d-11ea-98c0-2dba4e094aca.png';
void main() {
runApp(MyApp());
}
class MyApp extends StatelessWidget {
Widget build(BuildContext context) {
return MaterialApp(
debugShowCheckedModeBanner: false,
title: 'Flutter Demo',
theme: ThemeData(
primaryColor: Color(0xFF2E8376),
),
home: FlightBookingPage(),
);
}
}
class FlightBookingPage extends StatelessWidget {
Widget build(BuildContext context) {
return Scaffold(
appBar: AppBar(
elevation: 0,
leading: Icon(Icons.navigate_before),
),
body: Column(
children: [
/* ここにWidgetを並べていく */
],
),
);
}
}
フライト情報
次にフライト情報の部分を作っていきましょう。
フライト情報にはテキストとアイコンを並べていきます。
提供されている flight アイコンは、飛行機が上を向いているデザインになっています。
ここでは、右を向いたデザインにしたいのですが、どの様にすれば良いでしょうか?
この様にWidgetを変形させたい時は Transform を使うと便利です。
Transform では色々な機能が提供されてますが、
ここでは Transform.rotate() を使い、Wigetを回転させてみましょう。
https://www.youtube.com/watch?v=9z_YNlRlWfA
class _AirportName extends StatelessWidget {
final String shortName;
final String fullName;
const _AirportName({
Key? key,
required this.shortName,
required this.fullName,
}) : super(key: key);
Widget build(BuildContext context) {
return Column(
crossAxisAlignment: CrossAxisAlignment.start,
children: [
Text(
shortName,
style: TextStyle(
color: Colors.white,
fontSize: 32,
),
),
Text(
fullName,
style: TextStyle(
color: kColorFlightText.withOpacity(0.5),
),
),
],
);
}
}
class _FlightIcon extends StatelessWidget {
Widget build(BuildContext context) {
return Container(
width: 52,
height: 52,
decoration: BoxDecoration(
border: Border.all(
color: kColorFlightIcon,
width: 2,
),
borderRadius: BorderRadius.circular(52 / 2),
),
child: Transform.rotate(
angle: pi / 2,
child: Icon(
Icons.flight,
color: kColorFlightIcon,
size: 28,
),
),
);
}
}
class FlightInfo extends StatelessWidget {
Widget build(BuildContext context) {
return Column(
children: [
Material(
color: kColorPrimary,
elevation: 24,
shadowColor: kColorPrimary,
borderRadius: BorderRadius.only(
bottomRight: Radius.circular(24),
bottomLeft: Radius.circular(24),
),
child: Padding(
padding: const EdgeInsets.only(
left: 24,
right: 24,
top: 16,
bottom: 32,
),
child: Column(
children: [
Row(
mainAxisAlignment: MainAxisAlignment.spaceBetween,
children: [
_AirportName(shortName: 'DHK', fullName: 'Dhaka'),
_FlightIcon(),
_AirportName(shortName: 'LDN', fullName: 'London'),
],
),
SizedBox(height: 32),
Container(
alignment: Alignment.centerLeft,
child: Text(
'Monday, 18 May, 2020',
style: TextStyle(color: kColorFlightText.withOpacity(0.5)),
),
),
],
),
),
),
],
);
}
}
チケット一覧
次にチケット一覧の部分を作っていきましょう。
ここで、難しそうなのは
各チケットの複雑な形をしたボーダーを実装する方法でしょうか。
実装方針として以下の2つが考えられます。
CustomPaintを使い、ボーダーを含めた背景を描画するShapeBorderを使い、ボーダーを描画する
ここでは、ShapeBorderを使う方法で実装してみます。
ShapeBorderを使うと、
Widgetのボーダーを描画しボーダーの形でWidgetの枠を形作る事ができます。
基本的には Path で、ボーダーの形を作ってあげればOKです。
今回のチケットの形だと line と ark を組み合わせることで作れそうですね。
(※ 2020年5月時点:Webでは不具合のため上手く描画されません)
また、チケット右側の詳細情報部分は Table を使うと簡単に実装できます。
格子状にWidgetを使う時は Table を使っていきましょう。
https://www.youtube.com/watch?v=_lbE0wsVZSw
class _TicketShapeBorder extends ShapeBorder {
final double? width;
final double? radius;
_TicketShapeBorder({
required this.width,
required this.radius,
});
EdgeInsetsGeometry get dimensions {
return EdgeInsets.all(width!);
}
ShapeBorder scale(double t) {
return _TicketShapeBorder(
width: width! * t,
radius: radius! * t,
);
}
ShapeBorder? lerpFrom(ShapeBorder? a, double t) {
if (a is _TicketShapeBorder)
return _TicketShapeBorder(
width: lerpDouble(a.width, width, t),
radius: lerpDouble(a.radius, radius, t),
);
return super.lerpFrom(a, t);
}
ShapeBorder? lerpTo(ShapeBorder? b, double t) {
if (b is _TicketShapeBorder)
return _TicketShapeBorder(
width: lerpDouble(width, b.width, t),
radius: lerpDouble(radius, b.radius, t),
);
return super.lerpTo(b, t);
}
Path getInnerPath(Rect rect, {TextDirection? textDirection}) {
return getOuterPath(
rect.deflate(width!),
textDirection: textDirection,
);
}
Path getOuterPath(Rect rect, {TextDirection? textDirection}) {
final r = radius!;
final rs = radius! / 2; // 区切り部分の半径
final w = rect.size.width; // 全体の横幅
final h = rect.size.height; // 全体の縦幅
final wl = w / 3; // ロゴ部分の横幅
return Path()
..addPath(
Path()
..moveTo(r, 0)
..lineTo(wl - rs, 0) // →
..arcToPoint(
Offset(wl + rs, 0),
radius: Radius.circular(rs),
clockwise: false,
)
..lineTo(w - r, 0) // →
..arcToPoint(Offset(w, r), radius: Radius.circular(r))
..lineTo(w, h - rs) // ↓
..arcToPoint(Offset(w - r, h), radius: Radius.circular(r))
..lineTo(wl + rs, h) // ←
..arcToPoint(
Offset(wl - rs, h),
radius: Radius.circular(rs),
clockwise: false,
)
..lineTo(r, h) // ←
..arcToPoint(Offset(0, h - r), radius: Radius.circular(r))
..lineTo(0, r) // ↑
..arcToPoint(Offset(r, 0), radius: Radius.circular(r)),
Offset(rect.left, rect.top),
);
}
void paint(Canvas canvas, Rect rect, {TextDirection? textDirection}) {
final paint = Paint()
..style = PaintingStyle.stroke
..strokeWidth = width!
..color = kColorTicketBorder;
canvas.drawPath(
getOuterPath(
rect.deflate(width! / 2.0),
textDirection: textDirection,
),
paint,
);
}
}
class _Ticket extends StatelessWidget {
final Widget image;
const _Ticket({
Key? key,
required this.image,
}) : super(key: key);
Widget build(BuildContext context) {
return Container(
width: double.infinity,
height: 128,
decoration: ShapeDecoration(
color: Colors.white,
shape: _TicketShapeBorder(width: 1, radius: 16.0),
),
child: Row(
children: [
Expanded(
flex: 1,
child: Container(
padding: EdgeInsets.all(24),
child: image,
),
),
Container(
width: 1,
height: double.infinity,
margin: EdgeInsets.symmetric(vertical: 8.0),
color: kColorTicketBorder,
),
Expanded(
flex: 2,
child: Container(
padding: EdgeInsets.symmetric(horizontal: 24),
child: Table(
children: [
TableRow(
children: [
Column(
crossAxisAlignment: CrossAxisAlignment.start,
children: [
Text(
'Departure',
style: TextStyle(color: kColorText),
),
SizedBox(height: 4),
Text(
'04:25 pm',
style: TextStyle(
color: kColorTextDark,
fontSize: 18,
),
),
],
),
Column(
crossAxisAlignment: CrossAxisAlignment.start,
children: [
Text(
'Arrive',
style: TextStyle(color: kColorText),
),
SizedBox(height: 4),
Text(
'07:55 pm',
style: TextStyle(
color: kColorTextDark,
fontSize: 18,
),
),
],
),
],
),
TableRow(
children: [
SizedBox(height: 8),
SizedBox(height: 8),
],
),
TableRow(
children: [
Column(
crossAxisAlignment: CrossAxisAlignment.start,
children: [
Text(
'Estimation',
style: TextStyle(color: kColorText),
),
SizedBox(height: 4),
Text(
'4h, 30m',
style: TextStyle(
color: kColorTextDark,
fontSize: 18,
),
),
],
),
Column(
crossAxisAlignment: CrossAxisAlignment.start,
children: [
Text(
'\$250.00',
style: TextStyle(
color: kColorPrimary,
fontSize: 18,
fontWeight: FontWeight.bold,
),
),
SizedBox(height: 4),
Text(
'/person',
style: TextStyle(color: kColorText),
),
],
),
],
),
],
),
),
),
],
),
);
}
}
class TicketList extends StatelessWidget {
Widget build(BuildContext context) {
return Expanded(
child: Column(
children: [
Padding(
padding: const EdgeInsets.only(
top: 24,
bottom: 8,
left: 16,
right: 16,
),
child: Row(
mainAxisAlignment: MainAxisAlignment.spaceBetween,
children: [
Text(
'Tickets',
style: TextStyle(
color: kColorTextDark,
fontSize: 18,
),
),
Icon(Icons.filter_list, color: kColorText),
],
),
),
Expanded(
child: SingleChildScrollView(
child: Padding(
padding: const EdgeInsets.symmetric(
horizontal: 16,
vertical: 8,
),
child: Column(
children: [
_Ticket(
image: Image.network(kSingaporeLogoUrl),
),
SizedBox(height: 8),
_Ticket(
image: Image.network(kQantasLogoUrl),
),
SizedBox(height: 8),
_Ticket(
image: Image.network(kEmiratesLogoUrl),
),
SizedBox(height: 8),
_Ticket(
image: Image.network(kHainanLogoUrl),
),
],
),
),
),
)
],
),
);
}
}
作成したWidgetを表示
最後に、作成したフライト情報・チケット一覧のWidgetを表示しましょう。
最初に作成した、土台部分に組み込めばOKです。
class FlightBookingPage extends StatelessWidget {
Widget build(BuildContext context) {
return Scaffold(
appBar: AppBar(
elevation: 0,
leading: Icon(Icons.navigate_before),
),
body: Column(
children: [
FlightInfo(),
TicketList(),
],
),
);
}
}
お疲れさまでした
UIは無事作成できたでしょうか?
この他にも様々なUIを作ってみて、Flutterで複雑なUIが表現できるように頑張りましょう 💪
